Friday 31 January 2014

Should you drink Vitamin Water? The Pros and Cons

Over the past few years, vitamin water has become a wildly popular beverage all across the US. After all, the overall appeal of getting your daily dose of vitamins just by drinking some deliciously flavored water makes getting to good nutrition easy for most people, explaining the popularity of this particular drink. But is it more hype than hydration? Despite the fact that vitamin water is marketed as a healthier alternative to sodas and juices, not everything about this vitamin infused beverage is all good news.

Image: grandparents

Pros of Vitamin Water

1. Vitamin Water Contains Essential Vitamins 
The average bottle of vitamin water contains 50 to 100 percent of your daily-recommended dosage of several different vitamins, making it a beneficial beverage in several aspects.

2. Vitamin Water is Better than Sodas and Juices
It’s easy to see that vitamin water is more beneficial to your health and weight than sugar laden, carbonated beverages. Most vitamin waters on the market contain roughly half the calories and carbohydrates of soda, and sodas can’t offer the health benefits of vitamin inclusion.

3. Vitamin water is also better than juice, simply because there is usually far less sugar in vitamin water than in most fruit juices you will find today, making vitamin water one of the better choices in beverage options.

Cons of Vitamin Water

1.High Calorie Content

Even though vitamin water has fewer calories than soda and juices, it’s still one of the most loaded calorie options in the drinkable market. The average 20 ounce bottle of vitamin water contains almost as many calories  as a single 12 ounce can of pop; certainly something that would make calorie conscious consumers raise an eyebrow.

2.Vitamin Water isn't Cheap

No matter how you slice it, vitamin water is a very expensive habit. Buying just a single bottle of vitamin water a day adds up to almost $400 a year. If you compare that to regular water, vitamin water pales in comparison to plain old water cost wise.

3.The Vitamins in Vitamin Water are Virtually Unnecessary

The vitamins contained in most vitamin waters are vitamins that the average person can get by simply maintaining a healthy diet , and most people get them already. Even though the concept of vitamin water is appealing, it’s equally unnecessary. If you want to ensure that you are getting enough vitamins each day, consider taking a multivitamin instead of skating by on high calorie options like vitamin water.

The bottom line is that even though vitamin water is a healthier alternative to soda and juices, plain, old-fashioned water is still best.

Source: livinghealthy360.

Thursday 30 January 2014

Leg Exercises for sexy legs


1.Warrior III

Image: namaste.tv 


Stand with the feet together, and lift up the left leg with a pointed toe, putting your body weight onto the standing, right leg. Continue to lift your leg and drop the head and torso so they form a straight horizontal line from head to toe with the arms at your sides. Engage your core and make sure the left thigh, hip, and toes are aligned. Remain facing down and keep your back as straight as possible. Ensure your right knee doesn't lock and center the weight on the middle of the foot. Hold for 5 breaths and then slowly return to standing.

Switch legs and repeat.

2.Chair Squat

Image: transformationtrainer.com


This is a perfect move for beginners, and we're betting you're sitting on the only equipment you need as you read this. Hint: If you have a chair (and your glutes), you're good to go.

How to do it: Begin standing with your back to a chair, feet hip-width apart. While keeping your weight centered on your heels, draw in your abs and hinge forward at the hips slowly lowering your butt toward the chair. Pause right before you would sit down and return to standing while keeping the core engaged.

Do 3 sets of 10-15 reps.

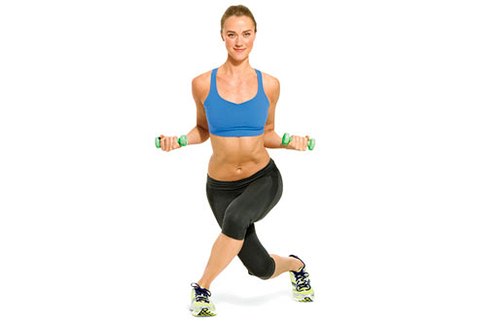
3.Pivoting Curtsy Lunge


How to do it: Standing with feet hip-width apart, step your right foot diagonally behind you and into a 7 o'clock position. Bend both knees so you're in a lunge stance. Lean your torso forward 30 degrees and pulse up and town 10-15 times. Straighten the body and pivot 180 degrees so your right foot comes to the front. Again, lower into a lunge.

Pulse up and down 10-15 times on each side to complete one set; do 3 sets.

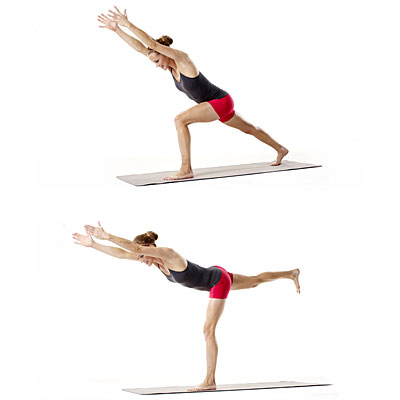
4.Low Lunge Hover


This standing move works both the legs and butt.

How to do it: Stand with feet hip-width apart before stepping your right foot back, and lowering into lunge stance with the left knee over the ankle. Bring your arms over your head and hinge forward from the waist. Lower the chest forward toward the thighs as your arms reach forward. Lift the right leg while straightening the left. Hold for 3 breaths before returning to the starting lunge position.

Do 3 reps; switch legs and repeat.

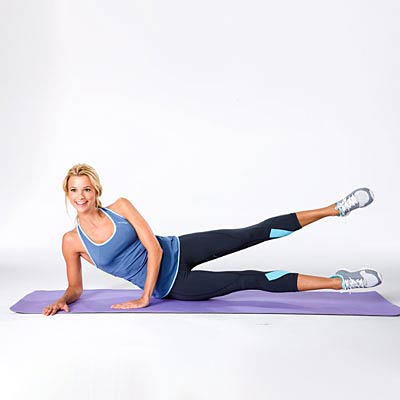
5. Knee Lift-Leg Kick Combo

Image: Health


This move is pretty challenging; if you can't complete the full amount of recommended reps feel free to do less and work your way up to completing the full set.

How to do it: Lie on your right side with the upper body supported by the right elbow and tricep, which should be flat on the mat at your side. Stack the legs and hip, and bend the knees. Lift the top bent leg, keeping it level, and then lower it. Straighten both legs and let them fall into a small split position (with one leg split over the other). Hover the bottom leg about 1-2 inches from the floor with knees facing forward. Return to starting position to complete one rep.

Do 30-40 reps, then switch sides and repeat.

Follow us on Twitter, Facebook, Instagram
Source: Health.com


Wednesday 29 January 2014

How to make your breakfast healthier

So...breakfast. It can actually be kind of tricky—there's evidence that working out before you eat it burns more fat, that skipping it could maybe help weight loss, and also that skipping it could maybe (possibly) be bad for your heart.


But there are plenty of ways to make your breakfasting experience a healthy one: breakfast salads, smoothies, and even some dinner recipes you can totally adapt for the morning, instead.

And, to add yet another way to healthify your breakfast, I'd like to introduce you to MixMyOwn . OK. So when I eat cereal, I'm a big fan of adding a little from every box in my cabinet until the mixture is just right—and that's basically what MixMyOwn does. It customizes your cereal to make it what you want to be—using lots of healthy ingredients, such as bee pollen powder, baobab fruit powder, goji berries, quinoa, acai powder, chia seeds, plus muesli, granola, multigrain cereal flakes, and oatmeal mix. It's an exciting (and yummy!) thing to try out—and here are seven other ways to make your breakfast healthy (and delish).

Don't skip it. Research has suggested that skipping a balanced morning meal can lead to snacking and overeating during the rest of the day. So what does "balanced" mean? Make sure to get in enough fiber, protein, and carbs—the mixture will fill you up and keep you fueled until lunchtime.

Eat something you like. If you love eating a plain scrambled egg in the morning, awesome. But if you don't, then find something that you actually do like. Why? Because then you won't skip it.

Don't go the high-fat route. Fatty breakfasts (um, hello, bacon) won't keep you full as long (and they may make you feel even more tired as the day goes on).

Look for fiber. Fiber is a) filling, and b) recommended by dietitians for the possibility it might help reduce the risk for heart disease.

Get in some protein. Protein is an essential ingredient for your day-to-day—women need about 46 grams daily . Add some seeds or nuts to your breakfast, which provide both protein and good-for-your-heart fats.

Make it portable. Mornings are often the worst—has anyone else gone sprinting out the door while leaving the one thing you needed for work at home? Argh. If you can, think ahead and plan out a morning smoothie that's filled with fresh fruits and veggies (you can even blend things like muesli for extra health benefits).

Throw in some superfoods. These healthy ingredients can help boost the immune system and maybe even help lower the risk of diabetes, cancer, and heart disease. Look to things such as blueberries, seeds, and nuts—blend them up in your smoothie, or sprinkle over your oatmeal or cereal.

Source: Glamour

Monday 27 January 2014

Easy Healthy Lunch Recipe : Curried Chicken Pitas

Cranberries and pear are sweet counterpoints in this tangy curried chicken salad. Toasted sliced almonds add a nutty crunch.


INGREDIENTS
6 tablespoons nonfat plain yogurt
1/4 cup low-fat mayonnaise
1 tablespoon curry powder
2 cups cooked, cubed chicken breast (see Tip)
1 ripe but firm pear, diced
1 stalk celery, finely diced
1/2 cup dried cranberries
1/4 cup sliced or slivered almonds, toasted (see Tip)
4 4- to 5-inch whole-wheat pita breads, cut in half
2 cups sprouts

PREPARATION
Combine yogurt, mayonnaise and curry powder in a large bowl. Add chicken, pear, celery, cranberries and almonds; toss to combine.
Fill each pita half with 1/2 cup chicken salad and 1/4 cup sprouts.

Find more: Eating Well

Wednesday 22 January 2014

The Health Benefits of Garlic

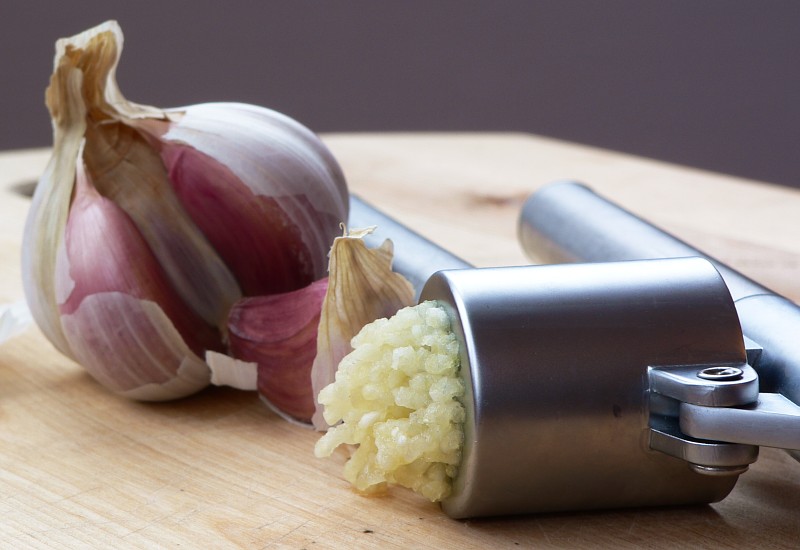
Garlic brings a lovely taste to our food, its especially good on a pizza... *Yes I eat pizza occasionally and I try to make it as healthy as possible. Anyways before I doddle along about how good garlic tastes, lets look at the wonderful benefits it brings into our overall health.


1. Its a Immune booster

The allicin found in garlic helps boost our immune system reducing the our bodies from catching common colds.

2. Packed with vitamins and nutrients

Garlic is packed with a lot of nutrients and vitamins such as calcium, zinc and  vitamin A,B,B2 and C

3. Its a natural antibiotic

The allicin powder in garlic is said to be a very powerful antibiotic.

4. Reduces heart disease

Garlic helps the blood pass easily through your blood vessels by thinning it. You just need 1 glove of garlic a day to keep your heart healthy

5. Helps with blood pressure

Garlic helps regulate your blood pressure and also lowers blood cholesterol levels.

  6. Prevents stomach and colon cancer

Sulfur in garlic helps to stimulate the immune system natural defense against cancer. 

Wednesday 15 January 2014

Weight Loss Training Plan: 8 minute workout


The entire idea of an eight-minute workout goes against conventional wisdom. And that's true—unless you're following the 8-Hour Diet, in which case eight minutes, first thing in the morning, is all you need to rev your metabolism and torch calories.

Here's why: Unlike the average American who's feasting 24-7, you've started a diet program in which you're eating whatever you want, but in a strict, eight-hour window each day. Much of the caloric value of the food you eat is stored in the liver as glycogen. By following the 8-Hour Diet and not running your liver the way Howard Stern runs his mouth (i.e., constantly), you give your body the chance to burn off that glycogen and start burning fat. And that happens regardless of whether you exercise or not.

When you jump-start your day with a tiny bit of exercise, you tap into your fat stores earlier and more effectively. By exercising before your first meal, you'll boost your metabolism and maximize the amount of time your body is burning fat.

Combined with the 8-Hour Diet, these three simple exercise routines will help you shed fat faster. Up the intensity by combining them into 16-, 24- or 32-minute routines. But aim for consistency: It's better to do eight minutes every day than 32 minutes once or twice a week.

WORKOUT 1: Two-Exercise Routine (Move 1 and Move 2)
These two exercises use your own body weight to target hard-to-tone areas like the butt, thighs, arms, and shoulders. Do eight reps of exercise 1A, followed by eight reps of 1B. Repeat as many rounds as you can in eight minutes, resting when needed. You'll burn about 16 calories per set.

WORKOUT 2: Combined Exercise Intervals (Move 3, Move 4, Move 5, and Move 6)
Zap body fat with these two combo routines. Do the first exercise for 60 seconds, then immediately perform the second exercise for 60 seconds. Rest one minute. Do a second round of the same exercises, then rest for another minute. Do your third round, and you're done—eight minutes of intense calorie burn.

WORKOUT 3: Up and At 'Em Blood Pumpers (Move 7 and Move 8)
These fast-moving exercises get your blood flowing and your heart rate up. Do one exercise for 20 seconds, then rest for 20 seconds. Do the second exercise for 20 seconds, then rest for another 20 seconds. That's one rep. Do six reps.

MOVE 1: Body-Weight Power Squat

Stand with your feet slightly beyond shoulder-width apart, toes forward, hands next to your sides (a). Simultaneously push your hips back and swing your arms backward, lowering your body until your thighs are almost parallel to the floor (b). Pause, then quickly push yourself back to the starting position, swinging your arms above your head and ending the movement on your toes (c).

MAKE IT EASIER: Put a box or chair behind you and squat to the surface each time (without resting your butt on the chair). Pause momentarily, then push yourself up.

MAKE IT HARDER: Jump up from the down position of the squat instead of just standing up.

MOVE 2: Bucking Hop


Get down on all fours, with your hands and knees on the floor (a). Raise your knees off the floor an inch or two. Without changing the posture of your lower back, "hop" your feet off the floor and to the right. (Imagine there's an imaginary line that you're hopping over.) Immediately hop to the left (b). Continue hopping back and forth, keeping your hips and shoulders square throughout the exercise. Tip: Keeping most of your weight on your shoulders will allow a smooth transfer from side to side.

MAKE IT HARDER: Increase the height and distance of each hop.

MOVE 3: T-Rotation


Get into a pushup position with your arms straight (a). In one movement, lift your right hand and rotate the right side of your body upward, until you're facing sideways and your arms and body form a T (b). Reverse the move, rotating to the left. Make sure to keep your hips raised and your body in a straight line as you rotate.

MAKE IT HARDER: Do a pushup between each rotation.

MOVE 4: Hip Extension


Lie on your back with your knees bent and feet flat on the floor. Place your arms at an angle out to your sides, palms down (a). Raise your hips, keeping your body straight from shoulders to knees (b). Hold for one or two seconds. Lower your hips to the floor and repeat.

MAKE IT HARDER: Place your fingertips on your forehead.

MOVE 5: Judo Pushup


Start in a pushup position but move your feet hip-width apart and forward, and raise your hips so your body almost forms an upside-down V (a). Lower the front of your body until your chin nears the floor (b). Lower your hips as you straighten your arms and raise your head and shoulders toward the ceiling (c). Push your hips back up into the upside-down V.

MAKE IT EASIER: Simply move back and forth from the upside-down V position to the starting pushup position.

MOVE 6: Duck Walk


Stand with your feet hip-width apart. Put your hands behind your head, flaring your elbows and squeezing your shoulder blades back and down (a). Squat as far down as you can (b) and walk a few steps forward, then backward without raising or lowering your hips (c).

MOVE 7: Plank Walkups


Start in plank position with bent elbows, resting your weight on your forearms. Keep your body in a straight line from your shoulders to your ankles, and contract your abs, stabilizing your core (a). Without changing your body posture (don't let your hips sag!), place your left hand on the floor, then your right hand (b). Push your body into the "up" position of a pushup (c). Lower yourself back onto your elbows into plank position, one arm at a time. Repeat as many times as you can.

MOVE 8: Speed Skater Hops


Stand on your left foot with your left knee slightly bent and your right foot slightly off the floor. Lower your body toward the floor (a), then bound to your right by jumping off your left leg. Land on your right foot and bring your left foot behind your right as you reach toward the outside of your right foot with your left hand (b). Reverse the movement, landing on your left foot.


Source: womenshealthmag.com

Monday 6 January 2014

The 8 Hour Diet and how it works....


This diet works on the theory that the human body is designed for periods of eating and then periods of fasting.

This involves consuming calories over an 8 hour period and then fasting for a 16 hour period each day. During the 16 hour period the human body should be focused on repair and rest, rather than continually digesting food.

8 Hour Food Window

All of a dieter’s daily calories must be consumed only during his/her predetermined 8 hour eating window. For example, if your calorie window is from 9am to 5pm, you must eat during that time period only.

The window can be adjusted depending on a person’s schedule and can be different during different days of the week. Dieters should eat this way at least 3 days a week in the beginning of the diet and gradually increase towards 7 days a week.

Eat Whatever You Want

There are no forbidden foods on The Eight Hour Diet, but Zinczenko does advise that this diet is not an excuse to overeat. Portion size must still be considered.

The only exception to this rule are sugary beverages, since the 8 Hour Diet discourages drinking calories.

Delay Breakfast

Dieters should delay eating breakfast until the beginning of their food window. For example, If you can’t start eating until 10am, Zinczenko recommends starting the day with a cup of tea, water, or coffee and doing some light exercise before any calories are consumed. (similar to 6 Weeks to OMG Diet)

Eat as Often as You Want

Snacks can be eaten as often as a dieter wants as long as all eating is within the 8 Hour Diet window.

Tomorrow we'll learn about the 8 Minute Exercise.

Source: EveryDiet.com